Wednesday, October 29, 2014

Cinnamon Rolls


I would like to call these "Fool Proof Cinnamon Rolls" but I'm not going to. Whenever I see a recipe for cinnamon rolls labeled as "Fool Proof" - I try them - I screw them up. 
Cinnamon rolls, before this day, have been my kryptonite!!
Either the bread wouldn't rise properly, or I wouldn't roll the dough out enough so there was too much bread and not enough filling, or the filling would drain out completely leaving me with this delicious caramel glaze in the bottom of the pan - delicious, but not what I wanted.
I had given up all hope of ever making a decent cinnamon roll, regardless of how "fool proof" the recipe was!!
Not for lack of talent though - Creme Brulee?! YES! Mousse of the chocolate and pumpkin variety (my latest accomplishment) Absolutely!! Dinner rolls?! Anytime!!
I am pretty decent in the kitchen when it comes to baking skills but for some reason, the cinnamon roll has always been "the one that got away". Until now!! Today! On this very day, October 29th, 2014, I have accomplished the impossible - I have made some pretty darn tasty cinnamon rolls!!!!!
Here is the recipe - which is compilation of 2 different recipes:

Rolls (which come from here):
3/4 C Milk
4 Tbl Butter cut into cubes
3/4 C Hot water
1/4 C Sugar
1 tsp Salt
4-5 C flour
1 heap Tbl Yeast

Microwave milk and butter 1 min, stir, microwave an additional 30 seconds. Pour into mixing bowl with Hot water, sugar, salt and 2 C of flour. Mix with dough hook for 1 min. With the mixer on low, add in yeast, and then slowly add in the remaining 2-3 C flour until the dough no longer sticks to the bowl. Mix 5 minutes. After 5 mins turn mixer off, remove bowl and let the dough set for 5 mins. Preheat the oven to 170  - - -

This is where you can decide to either finish out the dinner roll instructions which are: Grease pan, sharp knife and counter, turn dough out and cut into 12 or 24 equal portions, Roll into shape and place in pan. OR you can decide to take the cinnamon roll route which goes as follows.

Filling (which I got here)
1/2 C Butter
3/4 C Sugar (I used brown)
2 Tbl Cinnamon
3/4 C raisins, nuts, chocolate chips, boogers...whatever it is that you put in your cinnamon rolls - my family is full of weirdos, and they don't like "stuff" in their rolls, so I left this particular step out..

I mostly melted the butter, which means I took 2 of my adorable 1/4 c sticks of butter out of the fridge, unwrapped them, put them in a bowl (do I really need to add those steps in?!) and microwaved it until it started popping (oops! added chore to my list) and then I took it out and mushed *yes mushed* the unmelted butter into the melted butter, making it....mostly melted.
Anywho. Add the sugar and cinnamon to your mostly melted butter and stick it in the fridge (you heard me!! Stick your mostly melted butter, sugar and cinnamon BACK into the fridge) Now, turn out your dough on to your greased and floured counter and roll that sucker out until it's uhmmmmm I don't know. Cinnamon roll thickness?! what is that!? 1/4-1/2 inch?!
So roll it out until it's 1/3 inch in thickness and then spread that sugary goodness all over it!!!! so that it looks like this:
YUM right?!
Ok. Next your going to roll it up. Start from the long side, and take a deep breath, because this is where the patience is required. Remember you want the cinnamon roll to be good to you later, so don't be mean to it now!! Roll that delicious little bundle up until it' looks like a log. Now go get some floss. YES FLOSS!!! Take some floss, mine is minty in case you were wondering (and no it didn't alter the taste), and slide it under the middle of your log, bring your floss together and pull tight....if you're doing it right, it should have cut your cinnamon roll log perfectly, and by perfectly, what I really mean is - you have 2 logs instead of one.... Good!
Now, cut those halves in half, and those halves in half and so on and so forth until you have....6x4 issss....24. Approximately 24 cinnamon rolls. Put them in your buttered AND Sugared baking dish....Yes. I want you to smear butter all over the inside of your dish and then sprinkle sugar (white sugar) all over the butter!!!

Put those in the oven that is sitting at 170* for 20 mins. When the timer goes off, DON'T TAKE THEM OUT OF THE OVEN!!! Reset the oven for 350* and the timer for 15-20 mins.  When THAT timer goes off, your house should smell amazing, your family will shower you with roses and hugs and kisses and your husband will consider calling in sick so that he can stay home and take care of the kids so that you can run away for a few hours!!!!!!! Well that was fun. Now, back to reality.

Take them out of the oven and let them set on the back of the stove for a few mins while you make up whatever kind of icing or frosting you like to put on your cinnamon rolls.  - We favor the cream cheese variety.

There you have it. Cinnamon rolls!!! Now. take one, and go hide in the closet with your music so you can't hear the kids trashing the house!



Thursday, October 25, 2012

Eggnog Cookies

I have learned something while making these cookies. Eggnog has no middle ground; you either LOVE it, or you HATE it!! To each there own. I happen to be one of those "weirdo's" that LOVE LOVE LOVE Eggnog! I found this recipe for Eggnog Cookies, and I was all like =O WHAT?!?!?!
I knew they HAD to be made!!!! So with a little neighborly support (Thanks J for the eggnog) I made my house smell like warm, comforting eggnog! MMMMMmmmmmmm
*Makes 3 dozen cookies*
2 1/4 C Flour
1 tsp Baking Powder
1/2 tsp Cinnamon
1/2 tsp nutmeg
1 1/4 C Sugar
3/4 C Butter, softened
1/2 C Eggnog
1 tsp Vanilla 
2 egg yolks
1 Tbl nutmeg for sprinkling

Preheat oven to 300*
whisk together flour, baking powder, cinnamon and nutmeg.
In a large bowl cream butter and sugar, add eggnog vanilla and egg yolks. When it's smooth (Takes about 5 mins) mix in dry ingrediants until combined.
scoop onto cookie sheet 1 inch apart and bake at 300* for 20-25 mins.
Let cool on cookie sheet for a few mins and then transfer to a wire rack.

Eggnog Glaze
3 C Powdered Sugar
1/4 C Soft Butter
1/2 C Eggnog

Beat butter and sugar, and then pour in eggnog while mixing until desired consistency is reached.  Spread/drizzle/drip onto your cookies and then sprinkle with nutmeg!
*don't go crazy with the nutmeg sprinkle, it doesn't take much*
 These are super delish!! And if you like the taste but not texture of eggnog, make these!!!! You get the flavor with out the thick texture of eggnog!!
Needless to say, this one's a keeper!!!

Saturday, October 20, 2012

Pumpkin Doughnuts

Fall is upon us and 'tis the season for PUMPKIN!!!! I was having a strong desire (I shy away from the word craving because of the implications it brings when a woman uses it) for Pumpkin doughnuts, so I said to myself, "SELF?! Why don't we just make some?!"  So Myself found a recipe here and, with a little advice from my friends, I made some!!!
Here is my recipe:
 
3 1/2 c Flour
4 tsp Baking Powder
1 tsp Salt
2 tsp Pumpkin pie spice
1 c Sugar
2 tbl Butter softend
2 Eggs
2 tsp Vanilla
1/2 c. Buttermilk
1 c Pumpkin Puree (about 1/2 of the small can of pumpkin)
Canola oil for frying (I baked mine)

In a large bowl whisk together the flour, baking powder, salt, spice, and sugar. Make a well in the center.
In a separate bowl combine Butter, eggs, vanilla, buttermilk and pumpkin.
Dump wet ingredients into the well and stir until mixture is well combined.
Turn out onto a lightly floured surface, rolling the donut dough to approximately 1/4-1/2" thick.
Cut out with doughnut cutter.

*If you are baking them simply spoon batter into a doughnut pan (which looks like this, and yes; I do need one). If you don't have one of these nifty little contraptions, you can do what I did and put the dough/batter into a gallon sized zip lock bag and pipe them onto a large cookie sheet. I was able to fit 6 onto 1 jelly roll pan. That is how I ended up with my giant, very rustic, doughnuts!!

Heat 2 inches of oil in a large skillet over medium-high heat. When oil is hot, gently slide donuts into the oil, frying on the first side until edges of the donut are lightly browned, flip carefully and allow to cook on the other side until lightly browned.
Remove and dunk immediately into buttermilk glaze. allow to air dry on a cooling rack before serving.

Buttermilk glaze
3 c Powdered sugar
1/2 c. Buttermilk
1/2 tsp Vanilla
Whisk together in a small bowl until smooth.

*I topped mine with cinnamon sugar...because I love cinnamon sugar as much as I love pumpkin!
 

So there you have it!  Homemade, pumpkin muffins, disguised as doughnuts!


Oatmeal Banana Cake

This is AMAZING!!! It is my new favorite way to use up banana's that are getting a little too ripe. It is delicious, It's pretty, it's healthy and it's something I don't mind letting my kids eat all they want of!! AWESOME!!!
I started with THIS recipe from A Pinch of Joy
and altered it a bit to make it my own.

Here is what I ended up with.
  • 1.5 cups flour 
  • 1 C. Oats
  • 1 teaspoon baking soda
  • ¼ teaspoon salt
  • 1 teaspoon Pumpkin Pie Spice
  • ½ cup applesauce, sugar free or no sugar added
  • ¾ cup honey
  • 2 eggs
  • 3 ripe / overripe bananas, mashed
  1. Preheat oven and lightly grease a 9x13 cake pan
  2. Mix together applesauce and honey.
  3. Mash bananas. Overripe bananas work well for this purpose.
  4. Add bananas and eggs to applesauce and honey mixture and mix until well blended.
  5. Add flour, baking soda, pumpkin pie spice and salt at the same time – do NOT stir ingredients in one at a time. Mix just until dry ingredients are moistened.
  6. Divide batter evenly between the two prepared pans.
  7. Bake at 350 degrees for 30-40 minutes, until a toothpick inserted into the center of the loaf comes out clean.
  8. Let cake cool 5-10 minutes in the pan and then cut into squares and enjoy!!
Gary helped me make this and it turned out so delicious!!! Love it!!!


Monday, July 9, 2012

Frozen Banana Pie

This pie is amazing!! Perfect for summer when your last 2 bananas have gotten to that awkward, ripened stage where they are just fine, but also just brown enough that no one wants to eat them.
There is no butter in this pie, requires ZERO baking, and has very few ingredients. It does, however, require some planning and thinking ahead. Not very good for last minute.
Makes 2 pies

You'll need:
1 Can Evaporated milk, chilled in the freezer for at least 2-3 hrs.
2 eggs
1 C. Sugar
2 Bananas, mashed
Juice of 2 lemons, (1 medium lemon yields about 3 tbls juice)
2 pkgs Graham crackers
Whip chilled milk until it will stand in peaks.
Beat egg, add sugar, beat until light and lemon colored, and mashed bananas, add salt and lemon juice. Stir into whipped milk. Crush 1 pkg graham crackers at a time and push dry crumbs into pie dish (NO Butter is added to graham crackers).
Gently pour banana milk mixture into pie crumbs and freeze.  I gave my pies 24 hrs to freeze.
This pie seriously tastes like a frozen banana smoothie! It is SO good! The mashed bananas sink to the bottom and soak the crumbs which is what helps the crumbs stick together! It's like magic!!!!
It does not require any thawing time in order to cut. I took mine out and cut it right away. It does melt quite quickly so it's not a frozen pie that can be left out for any length of time.

This was definitely a hit at our house and will definitely be made again soon!!!!


Tuesday, April 10, 2012

Tacosanga

So aparently this is also calld layered enchiladas but tacosanga is a lot more fun to say!
It's super easy and pretty quick!
1lb hamburger
Taco seasoning
1 can vegitarian refried beans
1 can corn, drained
1 C salsa
Cheese
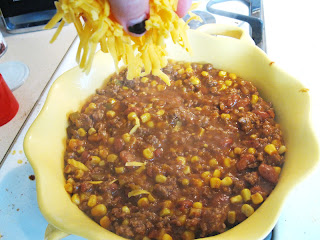
Brown Hamburger, add seasoning, beans, corn and salsa

Layer like a lasagna.
A bit of sauce, a taco shell

Sauce, cheese

Taco shell, sauce, cheese,
Top layer is just shell and cheese

Bake at 350 for 20-30 mins the cheese


Tuesday, November 1, 2011

FALLin for Roast Chicken

My Oh My!! This is AMAZING and SO Super easy!!
1 large sweet potato
3-4 small apples
4 carrots
2-3 stalks of celery
1/2 large onion
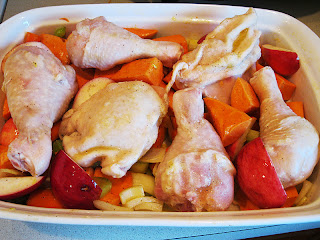
Chicken - I used frozen thighs and drumsticks because my kids love the "handle chicken"
Olive Oil, Salt & Pepper

Cut veggies and apples in to chunks and dump into roasting dish. Place chicken on top and coat everything with olive oil salt & pepper.
If you want more flavor you could add poultry seasoning, or herbs. My family tends to prefer the "raw" taste.
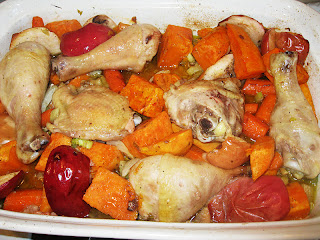
Roast in 350 oven for 1 hr or until chicken juices run clear.
After it came out I took the apple skins off and mushed the apples into the juices in the bottom of the pan and it made the best "sauce"

Make this TONIGHT!!! Your family will be warm, happy and ready for November!